
What to do immediately after a death in Ghana (Step-by-Step Guide)
March 4th 2026, 12:00 am
When a death happens, the first hours can feel unreal. Family members start calling. Decisions must be made. And in Ghana, practical steps often begin quickly because the home, the church, and the wider community will want clear direction.
This guide on what to do immediately after a death in Ghana focuses on the first critical actions, while keeping room for grief and respect.
First, pause and confirm the situation with care
If the person is at home and you are not sure what has happened, call for medical help immediately. If you are at a hospital or clinic, ask for clear confirmation and the next official steps.
In addition, do not rush to move the body if the death was sudden, unclear, or happened outside a health facility. Some cases require police notification and may involve a coroner process before a death can be registered.
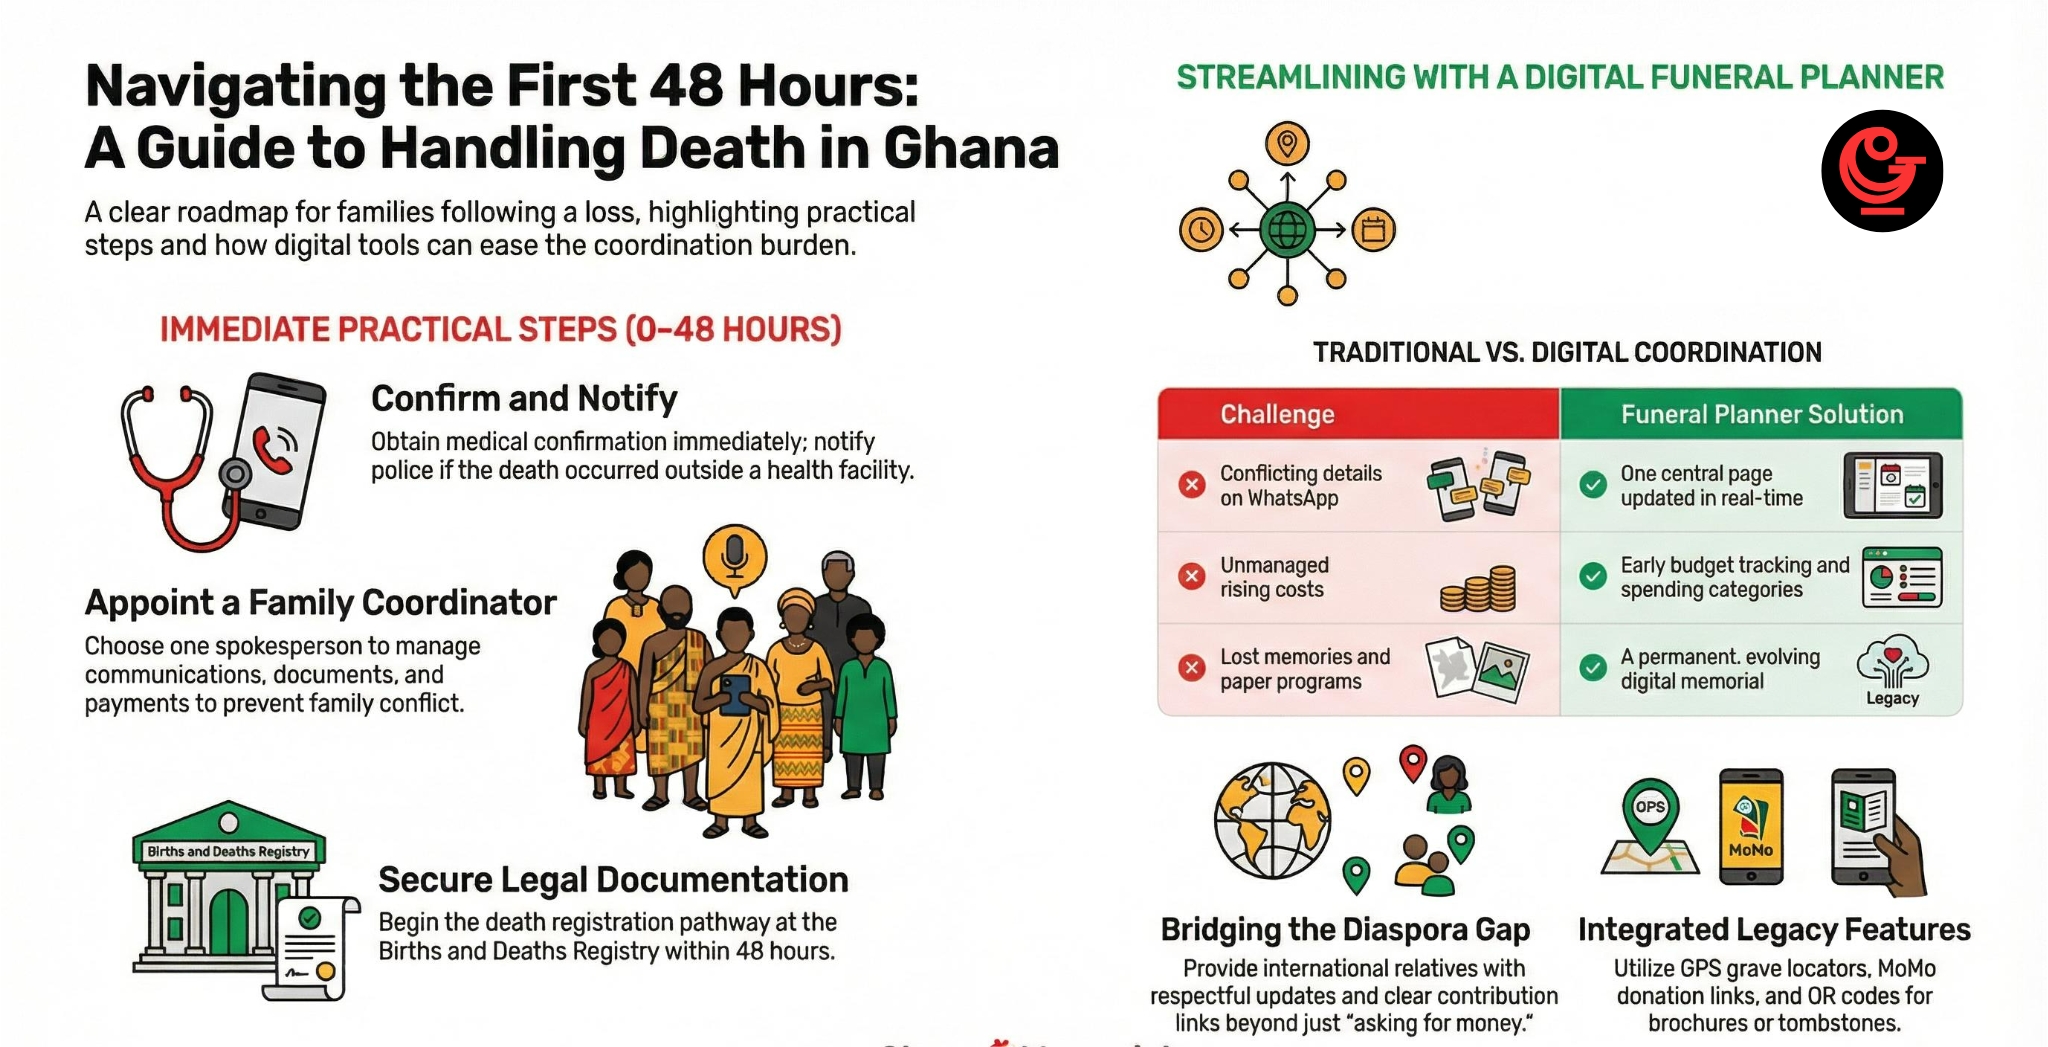
The immediate checklist (by time period)
Timeframe | What to do | Why it matters |
First 1–2 hours | Confirm the death with a health professional where possible. If the death was sudden/unknown or outside a facility, notify the nearest police station. | The registration pathway depends on whether the death was institutional or outside a facility. |
Same day | Contact close family decision-makers (spouse, head of family, elders). Choose one spokesperson. | Prevents confusion and reduces conflict when decisions begin. |
Same day | Decide where the body will be kept (hospital morgue/private mortuary). Ask about timelines, fees, and required documents. | This affects funeral timing, budget, and the planning workload. |
Within 24–48 hours | Start the death registration pathway with the Births and Deaths Registry in the district where the death occurred. | Death registration supports burial permits and future legal/financial processes. |
Before burial | Confirm burial permit needs and ensure documentation is in place before burial. | Burial-related documentation expectations can affect burial timelines. |
-visual-selection-1772636104.png)
Step 1: Understand the type of death (this changes the process)
A. Death in a hospital or after admission
The hospital usually issues the medical cause of death documentation, which is used for registration.
B. Death at home or outside a health facility
Where the death happens outside a health facility (or before 24 hours of admission), the process often begins with notifying the nearest police station.
Step 2: Choose a “family coordinator” and keep records
Even in strong families, grief can create confusion. Appoint one person to coordinate calls, documents, and payments.
Start a simple folder (paper or phone notes) for:
· Full name of the deceased (as on ID)
· Date/time/place of death
· Next of kin contacts
· Hospital/mortuary contact person
· Forms, receipts, and reference numbers
This saves time later—especially for diaspora relatives trying to support from abroad.
Step 3: Contact the mortuary and confirm what is required
Ask the mortuary or hospital:
· What documents do they require for admission and release
· Storage fees and payment steps
· Embalming options (if needed) and timelines
· Family identification requirements
If you have relatives abroad, it helps to share one written summary of these requirements to avoid repeated calls.
Step 4: Start death registration early (and keep copies)
In Ghana, deaths are registered through the Births and Deaths Registry in the district where the death occurred, using the relevant documentation (medical cause of death or coroner process, where required).
A practical tip: request extra copies of the death certificate later because banks, insurance, pensions, and estate processes may require them.
Step 5: Confirm burial permit requirements in your area
Burial permit steps can vary depending on the district and burial location. If burial is outside a public cemetery (for example, a family burial ground), confirm local requirements early to prevent delays.
Step 6: Begin funeral communication carefully (and avoid unnecessary printing)
After the first urgent steps, families often need to communicate quickly:
· One spokesperson shares verified information (avoid rumours).
· A short WhatsApp update goes to close family first.
· A public announcement is made only when the family agrees on key details.
In this stage, it helps to avoid printing too early because details can still change (venue, date, time, service order, printing quantities).
Step 7: Use a Funeral Planner as a modern alternative in today’s digital age
In the past, families relied on notebooks, phone calls, and “someone who remembers everything” to organise a funeral. That still happens. However, it becomes difficult when key family members are in different cities, diaspora relatives need clear updates, contributions come in from many people, or details keep changing.
A digital funeral planner can help without changing tradition. It does not replace culture or family leadership. It supports coordination—so the family spends less time managing confusion and more time focusing on the farewell.
How a Funeral Planner helps in the first days
Funeral planning needs (first days) | Common challenge | Funeral Planner alternative |
One “source of truth” for funeral details | Different versions of the date, venue, and time circulate on WhatsApp | One central plan page that can be updated once and shared |
Tasks and responsibilities | People assume “someone else is handling it” | A simple checklist with assigned roles (family, church, organiser) |
Budget clarity | Costs rise fast and are not tracked early | Budget headings and tracking (even before final numbers) |
Managing printed materials | Printing starts too early; changes cause waste | Plan first, then print decisions with fewer revisions |
Diaspora coordination | Diaspora only hears when money is needed | Respectful updates and a clear needs list |
Reduced stress | Too many calls and repeated questions | One link that answers the key questions in one place |
What families can do within the first 48 hours using a Funeral Planner
1. Create the funeral plan page (even if details are not final).
2. Add what is already known: family contact person, location, and next meeting date.
3. Start a basic checklist: mortuary steps, family meeting, church contact, service provider contact.
4. Add budget headings (not perfect numbers yet): mortuary, transport, printing, venue/church, refreshments.
5. Share the plan link with close family and diaspora so everyone stays aligned.
6. Update the plan as decisions are made—instead of sending multiple correction messages.
This approach matches today’s reality: families are still united, but they are no longer always in the same place.
The first steps after a death can feel heavy. However, when the right actions are taken early—confirmation, documentation, mortuary arrangements, and clear family coordination—the rest of the funeral planning becomes more manageable.
If your family wants a simple, respectful way to keep everyone aligned—especially across cities and the diaspora—use the Ghana Memorial Products Funeral Planner to manage tasks, updates, and key details in one place.
Related Articles
The benefits of web-to-print for funeral planning in Ghana
Browse the post to know more and explore detailed insights on this topic.
Read MoreTombstones in Ghana: Types, Materials, Prices & Timing
Browse the post to know more and explore detailed insights on this topic.
Read More